(SKU:SEN0257) Water pressure sensor水压传感器
来自DFRobot Product Wiki

目录 |
简介
本款水压传感器采用DFRobot Gravity标准3-Pin接口,标准5V供电,0.5~4.5V线性电压输出,可兼容各种Arduino控制器。配合DFRobot Gravity IO Expansion Shield,可直插Arduino。无需额外接线。
当它配合电磁阀、微型水流发电机以及其它传感器使用时,还可以通过编程和硬件组合的方式设计出许多智能的系统。可以说,水压传感器就像是贴着水管的听诊器,它会告诉你许多水的信息,包括水的强弱,水的有无。
应用场景
- 对室内,花园,菜园等生活场所中输水网络的水压进行检测;
- 对江、河、湖、海等户外领域的水压值进行测定;
- 水箱压力值的测量;
- 部分情况下可用于测量液位;
产品参数
- 测量介质:无腐蚀性液体或气体
- 接线方式:Gravity-3Pin接口 (Signal-VCC-GND)
- 压力量程:0~1.6 MPa
- 输出信号:0.5-4.5 V
- 供电电压:+5 VDC
- 精度等级:0.5%~1%FS (0.5%, 0~55℃)
- 螺纹连接方式:G1/4
- 转接头:G1/2转G1/4
- 防水等级:IP68
- 工作温度:-20~85℃
- 响应时间:<2.0 mS
- 静态电流:2.8 mA
- 性能保证压力:2.0 MPa
- 破坏压力:3.0 MPa
- 循环寿命:1000万次
引脚说明
|
|

输入输出关系和原理介绍
传感器内部有硅单晶材料,硅单晶材料在受到外力作用产生极微小应变时(一般步于400微应变),其内部原子结构的电子能级状态会发生变化,从而导致其电阻率剧烈变化(G因子突变)。用此材料制成的电阻也就出现极大变化,这种物理效应称为压阻效应。利用压阻效应原理,采用集成工艺技术经过掺杂、扩散,沿单晶硅片上的特点晶向,制成应变电阻,构成惠斯通电桥,利用硅材料的弹性力学特性,在同一切硅材料上进行各向异性微加工,就制成了一个集力敏与力电转换检测于一体的扩散硅传感器。给传感器匹配一放大电路及相关部件,使之输出一个标准信号,就组成了一台完整的压力变送器。


使用教程
Arduino 串口数据读取

串口显示代码
/************************************************************
   Water pressure sensor demo(Computer serial port)
   - Obtain the water pressure through the output voltage
     of the sensor.
**************************************************************/

/************************************************************
  Water Sensor Key Parameter
  - Parts No.:KY-3-5
  - Sensing range: 0 - 1.6 MPa
  - Input Voltage: 5VDC
  - Output Voltage: 0.5 - 4.5 VDC
    (Linearly corresponding to 0 - 1.6 MPa)
  - Accuary: 0.5% - 1% FS
**************************************************************/

/************************************************************
  Water Sensor Calibration

  The output voltage offset of the sensor is 0.5V (norminal).
  However, due to the zero-drifting of the internal circuit, the
  no-load output voltage is not exactly 0.5V. Calibration needs to
  be carried out as follow.

  Calibration: connect the 3 pin wire to the Arduio UNO (VCC, GND and Signal)
  without connecting the sensor to the water pipe and run the program
  for once. Mark down the LOWEST voltage value through the serial
  monitor and revise the "OffSet" value to complete the calibration.

  After the calibration the sensor is ready for measuring!
**************************************************************/

const float  OffSet = 0.483 ;

float V, P;

void setup()
{
  Serial.begin(9600);        // open serial port, set the baud rate to 9600 bps
  Serial.println("/** Water pressure sensor demo **/");
}
void loop()
{
  //Connect sensor to Analog 0
  V = analogRead(0) * 5.00 / 1024;     //Sensor output voltage
  P = (V - OffSet) * 400;             //Calculate water pressure

  Serial.print("Voltage:");
  Serial.print(V, 3);
  Serial.println("V");

  Serial.print(" Pressure:");
  Serial.print(P, 1);
  Serial.println(" KPa");
  Serial.println();

  delay(500);
}
做一个简易的水压检测仪
- 所需硬件:
- 1 x DFRduino UNO R3
- 1 x IO 传感器扩展板 V7.1
- 1 x Gravity: I2C LCD1602彩色背光液晶屏
- 1 x 7.4V 2500MA 锂电池 (带充放电保护板)
- 若干 杜邦线
连接图

LCD1602显示代码
/************************************************************
   Water pressure sensor demoB(LCD1602)
   - Obtain the water pressure through the output voltage
     of the sensor.
**************************************************************/

/************************************************************
  Water Sensor Key Parameter
  - Parts No.:KY-3-5
  - Sensing range: 0 - 1.6 MPa
  - Input Voltage: 5VDC
  - Output Voltage: 0.5 - 4.5 VDC
    (Linearly corresponding to 0 - 1.6 MPa)
  - Accuary: 0.5% - 1% FS
**************************************************************/

/************************************************************
  Water Sensor Calibration

  The output voltage offset of the sensor is 0.5V (norminal).
  However, due to the zero-drifting of the internal circuit, the
  no-load output voltage is not exactly 0.5V. Calibration needs to
  be carried out as follow.

  Calibration: connect the 3 pin wire to the Arduio UNO (VCC, GND and Signal)
  without connecting the sensor to the water pipe and run the program
  for once. Mark down the LOWEST voltage value through the serial
  monitor and revise the "OffSet" value to complete the calibration.

  After the calibration the sensor is ready for measuring!
**************************************************************/

#include <Wire.h>
#include <DFRobot_RGBLCD.h>                          //LCD头文件
const float  OffSet = 0.483 ;
float V;
int P;
unsigned int lcd_r = 0, lcd_g = 0, lcd_b = 0;
unsigned long delaytime = 0, lighttime = 0;

DFRobot_RGBLCD lcd(16, 2);
void setup()
{lcd.init();
  delay(5000);
  Serial.begin(115200);
  Serial.println("hello start");
  lighttime = millis();
  lcd.setCursor(0, 0);
  lcd.print("Water Pressure:");
  lcd.setRGB(255, 255, 000);
}
void loop() {
 lcd_r = random(256);
  delayMicroseconds(10);
  lcd_g = random(256);
  delayMicroseconds(10);
  lcd_b = random(256);
  if (millis() - lighttime > 3000)
  {
    lcd.setRGB(lcd_r, lcd_g, lcd_b);
    lighttime = millis();
  }
  //delay(100);

    V = analogRead(0)* 5.00 / 1024;                     //Sensor output voltage
    P = (V - OffSet) * 400*10;                          //Calculate water pressure
    lcd.setCursor(3, 1);

    lcd.print(  P/ 10000% 10);                         //LCD显示
    lcd.print(  P/ 1000% 10);
    lcd.print(   P/ 100 % 10);
    lcd.print(   P/ 10 % 10);
    lcd.print('.');
    lcd.print(  P  % 10);
    lcd.print(" kPa");

}
显示结果格式

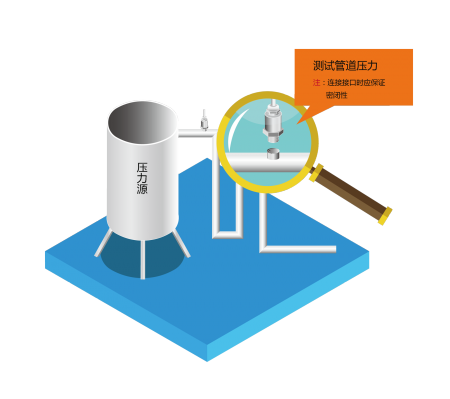
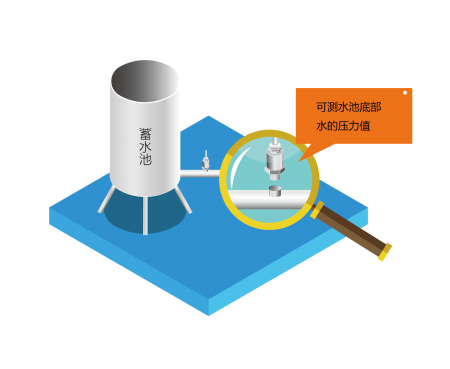
安装水压传感器
- 水管工时刻:

- 安装场景示例
- 安装场景示例
.png)
.png)
|
注意:
|
疑难解答
更多问题及有趣的应用,请访问论坛